一、升级前准备
a)设置交换机IP地址
首先使用交换机附带的Console线(RS232 Null-Modem Cable)连接交换机的Console口和计算机的串口(COM)。
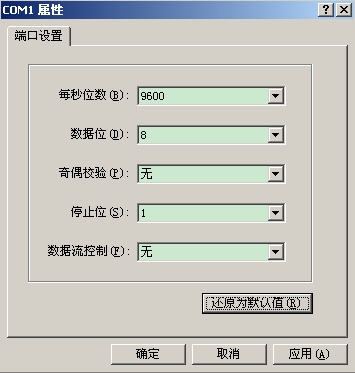
然后从windows的启动>程序>附件>通迅下点击超级终端,新建一个超级终端连接,名字自定义(如netgear、console、9600等都可以)。选择相应的串口(通常是COM1,一些USB-RS232线缆的串口可能是COM3以上)。选择相应串口以后的端口设置页面,点击“还原为默认值”(即选择9600每秒位数)如图:
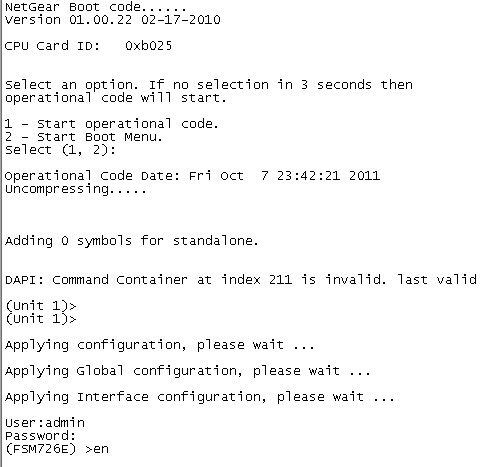
确定以后接着打开交换机电源,就可以在超级终端看到交换机的启动过程,直到超级终端出现User:提示,输入交换机用户名admin,默认密码为空,并键入enable,enable的默认密码也为空,进入特权模式(#提示符),就可以对交换机进行配置了。
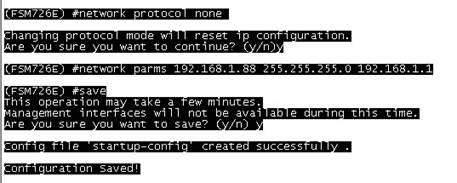
这个时候使用network命令对交换机进行IP地址设置:交换机默认IP地址是从DHCP获取,没有DHCP地址则为169.254.100.100,使用network protocol none命令取消从DHCP获取IP功能,再使用network parms 命令设置IP,掩码,网关(网关地址可选填)。
最后,用save命令保存配置。
b)设置tftp服务器
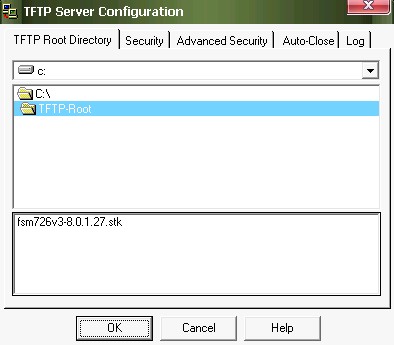
交换机升级文件的传输可以通过tftp协议进行,因此我们需要设置一个tftp服务器如SolarWinds TFTP Server:
(可以到http://solarwinds.net/Tools/Free_tools/TFTP_Server/index.htm下载并安装)
启动tftp服务器,点击软件界面的File>Configure,在TFTP Root Directory页配置tftp服务器根目录为升级文件所在目录如d:\firmware\GSM72xxR:
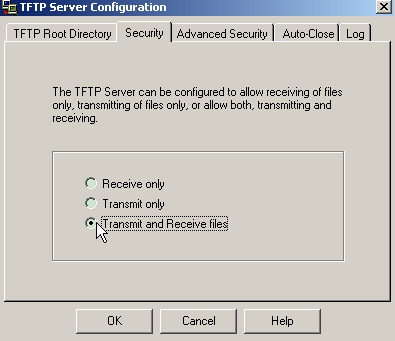
同时还要在Security页面配置TFTP服务器软件的收发模式为发送和接收:
c)配置本机IP地址与交换机相同网段,如192.168.1.49。
d)接着我们就可以按照第二、三、四节其中一种方法进行升级了。
二、通过CLI进行升级
可以通过copy tftp://// system:image进行升级:本次时的文件名是fsm726v3-8.0.1.27.stk
升级完成后必须重新启动交换机,新软件才会生效。
(FSM726E) #copy tftp://192.168.1.49/fsm726v3-8.0.1.27.stk system:image
Mode........................................... TFTP
Set Server IP.................................. 192.168.1.49
Path........................................... ./
Filename....................................... fsm726v3-8.0.1.27.stk
Data Type...................................... Code
Destination Filename........................... image1
Destination image is active.
WARNING:Continuing with this command will overwrite the active image.
Management access will be blocked for the duration of the transfer
Are you sure you want to start? (y/n) y#选择y确定升级
TFTP code transfer starting................................................................................ ................................................................................ ................................................................................ ................................................................................
此处警告:升级过程中,所有管理访问(如CLI,WEB,SNMP)都会被禁用,请等待升级完成,在升级过程中请不要断电否则会损换闪存里的软件。
- ###################### IMPORTANT INFORMATION ######################
-!!!!WARNING - Upgrade in Progress!!!!
- DO NOT power off the box as this will corrupt the image in flash!!
- Please allow up to 30 minutes, or for the console prompt to
- return for the upgrade to complete!!
- ALL management access (CLI, WEB, SNMP) is now blocked until done
- ###################################################################
TFTP code transfer starting
Verifying CRC of file in Flash File System
TFTP receive complete... storing in Flash File System...
File transfer operation completed successfully. #提示升级完成
(FSM726E) #reload #使用reload命令重启
The system has unsaved changes.
Would you like to save them now? (y/n) n#是否保存配置
Configuration Not Saved!
Are you sure you would like to reset the system? (y/n) y#确定重启
等待交换机重启完成后,使用show hard命令查看交换机软件信息
(FSM726E) #show hardware
Switch: 1
System Description............................. FSM726E - ProSafe 24 FE, 2 GE
Machine Model.................................. FSM726E
Serial Number.................................. B00002
Burned In MAC Address.......................... 00:1E:2A:C6:06:58
Software Version............................... 8.0.1.27
Bootcode Version............................... 01.00.22
Supported Java Plugin Version.................. 1.6
Current Time................................... JAN 01 17:45:56 1970 (UTC+0:00
Current SNTP Sync Status....................... Request Timed Out
三、在WEB页面通过TFTP进行升级
a)在IE浏览器地址栏输入交换机管理地址192.168.1.88打开交换机WEB管理页面,并使用默认的用户admin登录。
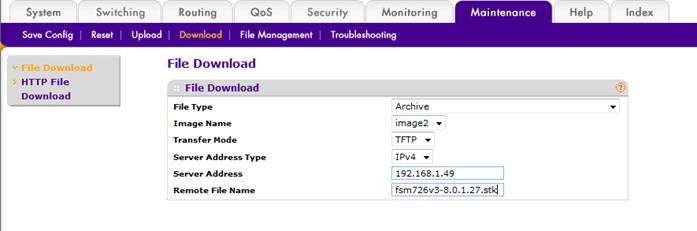
b)点击Maintenance下的Download,在File Down页面输入TFTP服务器IP地址192.168.1.49和升级软件的文件名fsm726v3-8.0.1.27.stk,File Type选择为archive。
c)点击APPLY进行升级,升级时页面会显示:“Transfer in progress.Please wait.”

d)升级完成后,页面提示“File transfer operation completed successfully.”
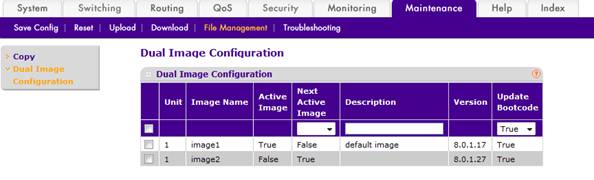
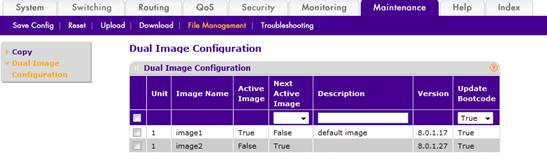
e)升级时选择升级image2可以在设备工作时进行升级,文件上传好之后再到maintenance—file management---Dual Image Configuration把image2的Next Active Image改为要用的true.重启设备之后image2就会选用image2了
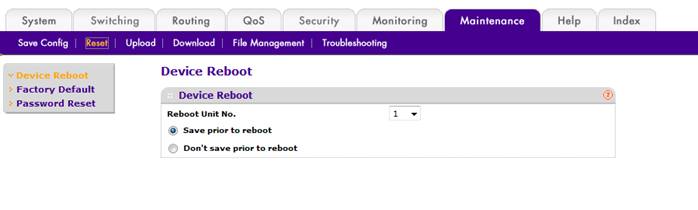
f)在Maintenance/Reset页面选中重启模式点APPLY进行重启。
Save prior to reboot:保存之前设置并重启;
Don’t save prior to reboot:不保存配置并重启。
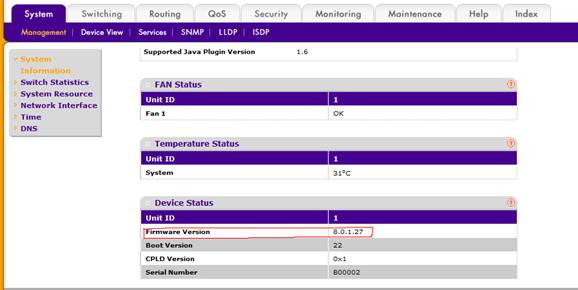
g)重启完成后在System/Management下的System Information页面查看软件版本。
四、在WEB页面通过http上传方式升级:
a)登录交换机管理页面,在Maintenance/Download/HTTP File Download页面,File Type选择为archive,Select File后面点击浏览(Browser)选择电脑文件夹里的升级文件。
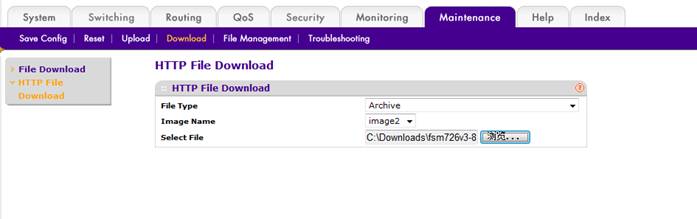
b)点击APPLY开始升级。
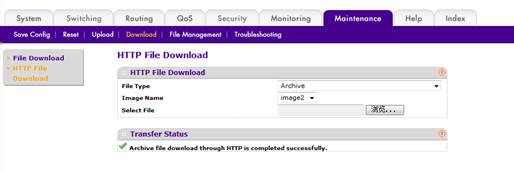
d)升级完成后,页面提示“File transfer operation completed successfully.”
e)升级时选择升级image2可以在设备工作时进行升级,文件上传好之后再到maintenance—file management---Dual Image Configuration把image2的Next Active Image改为要用的true.重启设备之后image2就会选用image2了
f)在Maintenance/Reset页面选中重启模式点APPLY进行重启。
Save prior to reboot:保存之前设置并重启;
Don’t save prior to reboot:不保存配置并重启。
g)最后重启交换机并查看软件版本。
五、通过XModem升级软件
当交换机原有版本不损坏或丢失,不能管理的情况下,可以使用XModem上传代码,步骤如下:
a)首先,交换机启动的时候,按esc键出现启动菜单
NetGear Boot code......
Version 01.00.22 02-17-2010
CPU Card ID:0xb025
Select an option. If no selection in 3 seconds then
operational code will start.
1 - Start operational code.
2 - Start Boot Menu.
Select (1, 2):
/*此时选择2进入高级菜单,1为启动交换机OS*/
Boot Menu
Options available
1- Start operational code
2- Change baud rate
3- Retrieve event log using XMODEM
4- Load new operational code using XMODEM
6- Display operational code vital product data
7- File system directory listing
8- Update boot code
9- Delete backup image
10 - Reset the system
11 - Restore configuration to factory defaults (delete config files)
12 - Activate Backup Image
13 - Password Recovery Procedure
14 - Upload a file through XMODEM
15 - Download a file through XMODEM
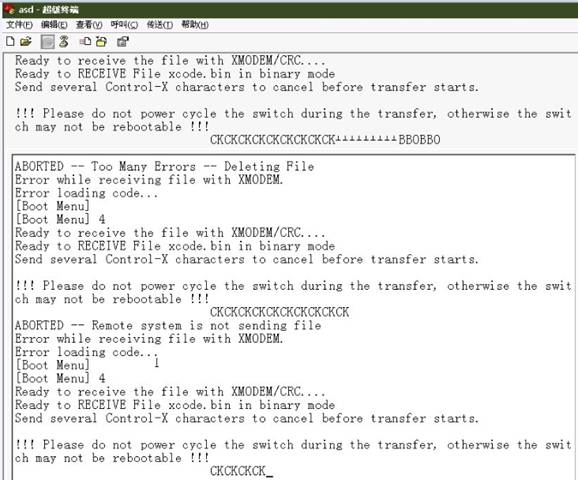
[Boot Menu] 4
/*选择4从XModem更新软件代码*/
Ready to receive the file with XMODEM/CRC....
Ready to RECEIVE File xcode.bin in binary mode
Send several Control-X characters to cancel before transfer starts.
CKCKCKCKCK
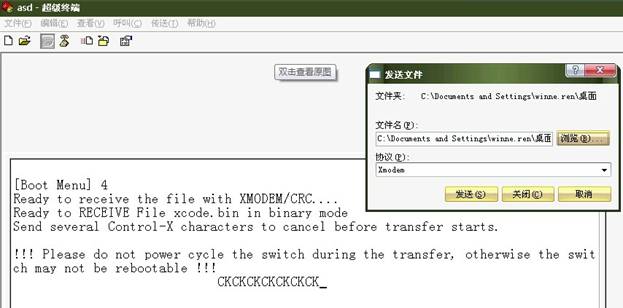
b)然后,从超级终端的菜单点击传送T>发送文件S
c)选定要传送的文件,选择对应的协议XModem,点击传送
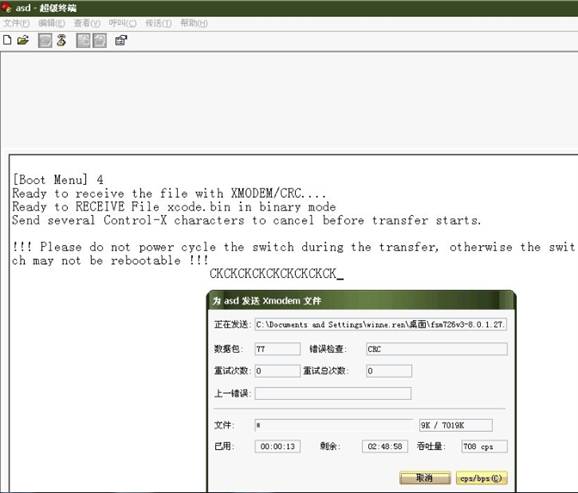
d)传送时状态:
e)传送完成后返回[Boot Menu]选择:
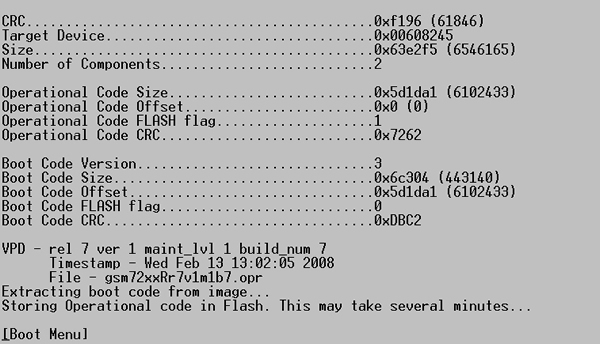
f)从菜单选择1启动交换机,启动完成后使用show hardware查看版本。
(FSM726E) #show hardware
Switch: 1
System Description............................. FSM726E - ProSafe 24 FE, 2 GE
Machine Model.................................. FSM726E
Serial Number.................................. B00002
Burned In MAC Address.......................... 00:1E:2A:C6:06:58
Software Version............................... 8.0.1.27
Bootcode Version............................... 01.00.22
Supported Java Plugin Version.................. 1.6
Current Time................................... JAN 01 17:45:56 1970 (UTC+0:00
Current SNTP Sync Status....................... Request Timed Out
Fans:
UnitDescriptionStatus
---------------------
1Fan 1OK
Temperature:
UnitSystem
------------
132c
CPLD Version:
UnitVersion
-----------------
10x1
|
序号 |
日期 |
工程师 |
更新摘要 |
|
1 |
2012-02-23 |
ZhiJie.Ou |
文档更新 |